之前有尝试看过Vue源码,但是理解都不是很深刻动不动就忘记了,现在来把前置条件学习一下。
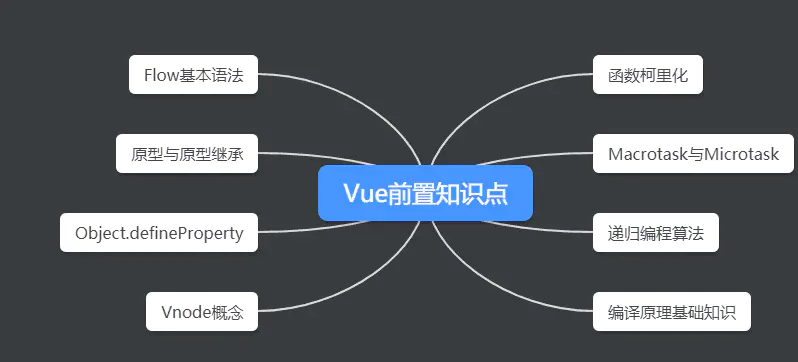
Flow基本语法
javascript是弱类型的语言,在写代码灰常爽的同时也十分容易犯错误,所以Facebook搞了这么一个类型检查工具,可以加入类型的限制,提高代码质量,举个例子:
function sum(a, b) {
  return a + b;
}
如果这么调用这个函数sum(‘a’, 1) 甚至sum(1, [1,2,3])这么调用,执行时会得到一些你想不到的结果,这样编程未免太不稳定了。那我们看看用了Flow之后的结果:
function sum(a: number, b:number) {
  return a + b;
}
多了一个number的限制,标明对a和b只能传递数字类型的,否则的话用Flow工具检测会报错。
其实这里大家可能有疑问,这么写还是js吗? 浏览器还能认识执行吗?当然不认识了,所以需要翻译或者说编译。其实现在前端技术发展太快了,各种插件层出不穷–Babel、Typescript等等,其实都是将一种更好的写法编译成浏览器认识的javascript代码(我们以前都是写浏览器认识的javascript代码的)。
我们继续说Flow的事情,在Vue源码中其实出现的Flow语法都比较好懂,比如下面这个函数的定义:
export function renderList (
  val: any,
  render: (
    val: any,
    keyOrIndex: string | number,
    index?: number
  ) => VNode
): ?Array<VNode>{
...
}
val是any代表可以传入的类型是任何类型;
keyOrIndex是string|number类型,代表要不是string类型,要不是number,不能是别的;
index?:number这个我们想想正则表达式中?的含义—0个或者1个,这里其实意义也是一致的,但是要注意?的位置是在冒号之前还是冒号之后–因为这两种可能性都有,上面代码中问号是跟在冒号前面,代表index可以不传,但是传的话一定要传入数字类型;如果问号是在冒号后面的话,则代表这个参数必须要传递,但是可以是数字类型也可以是空。
如果想学习Flow更多的细节, 可以看看下面这个学习文档:
原型与原型继承
原型链
创建对象
用obj.xxx访问一个对象的属性时,JavaScript引擎先在当前对象上查找该属性,如果没有找到,就到其原型对象上找,如果还没有找到,就一直上溯到Object.prototype对象,最后,如果还没有找到,就只能返回undefined。
创建一个Array对象:
var arr = [1, 2, 3];
其原型链是:
arr ----> Array.prototype ----> Object.prototype ----> null
Array.prototype定义了indexOf()、shift()等方法,因此你可以在所有的Array对象上直接调用这些方法。
创建一个函数:
function foo() {
    return 0;
}
函数也是一个对象,它的原型链是:
foo ----> Function.prototype ----> Object.prototype ----> null
由于Function.prototype定义了apply()等方法,因此,所有函数都可以调用apply()方法。
如果原型链很长,那么访问一个对象的属性就会因为花更多的时间查找而变得更慢,因此要注意不要把原型链搞得太长。
构造函数
除了直接用{ ... }创建一个对象外,JavaScript还可以用一种构造函数的方法来创建对象。
function Student(name) {
    this.name = name;
    this.hello = function () {
        alert('Hello, ' + this.name + '!');
    }
}
var xiaoming = new Student('小明');
xiaoming.name; // '小明'
xiaoming.hello(); // Hello, 小明!
如果不写new,这就是一个普通函数,它返回undefined。但是,如果写了new,它就变成了一个构造函数,它绑定的this指向新创建的对象,并默认返回this,也就是说,不需要在最后写return this;。
新创建的xiaoming的原型链是:
xiaoming ----> Student.prototype ----> Object.prototype ----> null
所以,xiaoming的原型指向函数Student的原型。如果你又创建了xiaohong、xiaojun,那么这些对象的原型与xiaoming是一样的:
xiaoming ↘
xiaohong -→ Student.prototype ----> Object.prototype ----> null
xiaojun  ↗
用new Student()创建的对象还从原型上获得了一个constructor属性,它指向函数Student本身:
xiaoming.constructor === Student.prototype.constructor; // true
Student.prototype.constructor === Student; // true

Object.getPrototypeOf(xiaoming) === Student.prototype; // true

xiaoming instanceof Student; // true
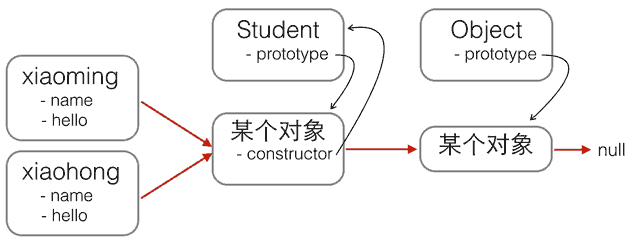
红色箭头是原型链。注意,Student.prototype指向的对象就是xiaoming、xiaohong的原型对象,这个原型对象自己还有个属性constructor,指向Student函数本身。
另外,函数Student恰好有个属性prototype指向xiaoming、xiaohong的原型对象,但是xiaoming、xiaohong这些对象可没有prototype这个属性,不过可以用__proto__这个非标准用法来查看。
现在我们就认为xiaoming、xiaohong这些对象“继承”自Student。
xiaoming.name; // '小明'
xiaohong.name; // '小红'
xiaoming.hello; // function: Student.hello()
xiaohong.hello; // function: Student.hello()
xiaoming.hello === xiaohong.hello; // false
-
xiaoming和xiaohong各自的name不同,这是对的,否则我们无法区分谁是谁了。 -
xiaoming和xiaohong各自的hello是一个函数,但它们是两个不同的函数,虽然函数名称和代码都是相同的!
如果我们通过new Student()创建了很多对象,这些对象的hello函数实际上只需要共享同一个函数就可以了,这样可以节省很多内存。
要让创建的对象共享一个hello函数,根据对象的属性查找原则,我们只要把hello函数移动到xiaoming、xiaohong这些对象共同的原型上就可以了,也就是Student.prototype:
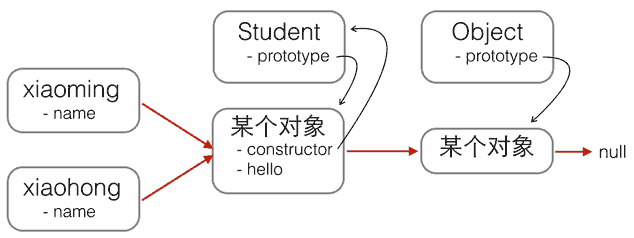
function Student(name) {
    this.name = name;
}

Student.prototype.hello = function () {
    alert('Hello, ' + this.name + '!');
};
用new创建基于原型的JavaScript的对象就是这么简单!
原型继承
JavaScript由于采用原型继承,我们无法直接扩展一个Class,因为根本不存在Class这种类型。
上文,Student构造函数:
function Student(props) {
    this.name = props.name || 'Unnamed';
}

Student.prototype.hello = function () {
    alert('Hello, ' + this.name + '!');
}
所以,Student的原型链:
基于Student扩展出PrimaryStudent,可以先定义出PrimaryStudent:
function PrimaryStudent(props) {
    // 调用Student构造函数,绑定this变量:
    Student.call(this, props);
    this.grade = props.grade || 1;
}
调用了Student构造函数不等于继承了Student,PrimaryStudent创建的对象的原型是:
new PrimaryStudent() ----> PrimaryStudent.prototype ----> Object.prototype ----> null
必须想办法把原型链修改为:
new PrimaryStudent() ----> PrimaryStudent.prototype ----> Student.prototype ----> Object.prototype ----> null
这样新的基于PrimaryStudent创建的对象不但能调用PrimaryStudent.prototype定义的方法,也可以调用Student.prototype定义的方法。
如果你想用最简单粗暴的方法这么干:
PrimaryStudent.prototype = Student.prototype;
这样的话,PrimaryStudent和Student共享一个原型对象,那还要定义PrimaryStudent干啥?
我们必须借助一个中间对象来实现正确的原型链,这个中间对象的原型要指向Student.prototype。
// PrimaryStudent构造函数:
function PrimaryStudent(props) {
    Student.call(this, props); // // 调用Student构造函数,绑定this变量:
    this.grade = props.grade || 1;
}

// 空函数F:
function F() {
}

// 把F的原型指向Student.prototype:
F.prototype = Student.prototype;

// 把PrimaryStudent的原型指向一个新的F对象,F对象的原型正好指向Student.prototype:
PrimaryStudent.prototype = new F();

// 以上三句也可改成
// PrimaryStudent.prototype = Object.Create(Student.prototype);

// 把PrimaryStudent原型的构造函数修复为PrimaryStudent:
PrimaryStudent.prototype.constructor = PrimaryStudent;

// 继续在PrimaryStudent原型(就是new F()对象)上定义方法:
PrimaryStudent.prototype.getGrade = function () {
    return this.grade;
};

// 创建xiaoming:
var xiaoming = new PrimaryStudent({
    name: '小明',
    grade: 2
});
xiaoming.name; // '小明'
xiaoming.grade; // 2

// 验证原型:
xiaoming.__proto__ === PrimaryStudent.prototype; // true
xiaoming.__proto__.__proto__ === Student.prototype; // true

// 验证继承关系:
xiaoming instanceof PrimaryStudent; // true
xiaoming instanceof Student; // true
新的原型链:

函数F仅用于桥接,我们仅创建了一个new F()实例,而且,没有改变原有的Student定义的原型链。
如果把继承这个动作用一个inherits()函数封装起来,还可以隐藏F的定义,并简化代码:
function inherits(Child, Parent) {
    var F = function () {};
    F.prototype = Parent.prototype;
    Child.prototype = new F();
    // 以上也可改成
    // Child.prototype = Object.Create(Parent.prototype);
    Child.prototype.constructor = Child;
}
这个inherits()函数可以复用:
function Student(props) {
    this.name = props.name || 'Unnamed';
}

Student.prototype.hello = function () {
    alert('Hello, ' + this.name + '!');
}

function PrimaryStudent(props) {
    Student.call(this, props);
    this.grade = props.grade || 1;
}

// 实现原型继承链:
inherits(PrimaryStudent, Student);

// 绑定其他方法到PrimaryStudent原型:
PrimaryStudent.prototype.getGrade = function () {
    return this.grade;
};
构造函数的继承
- 构造函数绑定
- prototype模式
- 直接继承prototype
- 利用空对象作为中介
- 拷贝继承
最简单的方法,使用call或apply方法,将父对象的构造函数绑定在子对象上
function Cat(name,color){
  Animal.apply(this, arguments);
  this.name = name;
  this.color = color;
}
var cat1 = new Cat("大毛","黄色");
alert(cat1.species); // 动物
prototype模式
如下:
Cat.prototype = new Animal();  // 将Cat的prototype对象指向一个Animal的实例,
                               // 它相当于完全删除了prototype 对象原先的值,然后赋予一个新值
Cat.prototype.constructor = Cat;
var cat1 = new Cat("大毛","黄色");
alert(cat1.species); // 动物
任何一个prototype对象都有一个constructor属性,指向它的构造函数。
如果没有”Cat.prototype = new Animal();”这一行,Cat.prototype.constructor是指向Cat的;加了这一行以后,Cat.prototype.constructor指向Animal
alert(Cat.prototype.constructor == Animal); //true
每一个实例也有一个constructor属性,默认调用prototype对象的constructor属性
alert(cat1.constructor == Cat.prototype.constructor); // true
因此,在运行”Cat.prototype = new Animal();”这一行之后,cat1.constructor也指向Animal!
这显然会导致继承链的紊乱(cat1明明是用构造函数Cat生成的),因此我们必须手动纠正,将Cat.prototype对象的constructor值改为Cat。
直接继承prototype
第三种方法是对第二种方法的改进。由于Animal对象中,不变的属性都可以直接写入Animal.prototype。所以,我们也可以让Cat()跳过 Animal(),直接继承Animal.prototype。
Cat.prototype = Animal.prototype;
Cat.prototype.constructor = Cat;  // 实际上把Animal.prototype对象的constructor属性也改掉了
var cat1 = new Cat("大毛","黄色");
alert(cat1.species); // 动物
这样做的优点是效率比较高(不用执行和建立Animal的实例了),比较省内存。缺点是 Cat.prototype和Animal.prototype现在指向了同一个对象,那么任何对Cat.prototype的修改,都会反映到Animal.prototype。
利用空对象作为中介
如下:
var F = function(){}; // F是空对象,所以几乎不占内存
F.prototype = Animal.prototype;
Cat.prototype = new F();
Cat.prototype.constructor = Cat; // 修改Cat的prototype对象,就不会影响到Animal的prototype对象
封装函数
function extend(Child, Parent) {
  var F = function(){};
  F.prototype = Parent.prototype;
  Child.prototype = new F();
  Child.prototype.constructor = Child;
  Child.uber = Parent.prototype; // 为子对象设一个uber属性,这个属性直接指向父对象的prototype属性; 等于在子对象上打开一条通道,可以直接调用父对象的方法
}
拷贝继承
简单说,如果把父对象的所有属性和方法,拷贝进子对象,不也能够实现继承
function extend2(Child, Parent) {
  var p = Parent.prototype;
  var c = Child.prototype;
  for (var i in p) {
    c[i] = p[i]; // 用的是浅拷贝的方法,c[i] 是指向到 p[i], 而非赋值,建议使用深拷贝
  }
  c.uber = p;
}
class继承
新的关键字class从ES6开始正式被引入到JavaScript中。class的目的就是让定义类更简单
用函数实现Student的方法:
function Student(name) {
    this.name = name;
}

Student.prototype.hello = function () {
    alert('Hello, ' + this.name + '!');
}
用新的class关键字来编写Student,可以这样写:
class Student {
    constructor(name) {
        this.name = name;
    }

    hello() {
        alert('Hello, ' + this.name + '!');
    }
}
比较一下就可以发现,class的定义包含了构造函数constructor和定义在原型对象上的函数hello()(注意没有function关键字),这样就避免了Student.prototype.hello = function () {...}这样分散的代码。
创建一个Student对象代码和前面章节完全一样:
var xiaoming = new Student('小明');
xiaoming.hello();
class继承
直接通过extends来实现:
class PrimaryStudent extends Student {
    constructor(name, grade) {
        super(name); // 记得用super调用父类的构造方法!
        this.grade = grade;
    }

    myGrade() {
        alert('I am at grade ' + this.grade);
    }
}
所以,PrimaryStudent的定义也是class关键字实现的,而extends则表示原型链对象来自Student。子类的构造函数可能会与父类不太相同,例如,PrimaryStudent需要name和grade两个参数,并且需要通过super(name)来调用父类的构造函数,否则父类的name属性无法正常初始化。
此外,PrimaryStudent已经自动获得了父类Student的hello方法,我们又在子类中定义了新的myGrade方法。
Object.defineProperty
这个方法在js中十分强大,Vue正是使用了它实现了响应式数据功能。
export function defineReactive (
  obj: Object,
  key: string,
  val: any,
  customSetter?: ?Function,
  shallow?: boolean
) {
  .....
  Object.defineProperty(obj, key, {
    enumerable: true,
    configurable: true,
    get: function reactiveGetter () {
      const value = getter ? getter.call(obj) : val
      if (Dep.target) {
        dep.depend()
        if (childOb) {
          childOb.dep.depend()
          if (Array.isArray(value)) {
            dependArray(value)
          }
        }
      }
      return value
    },
    set: function reactiveSetter (newVal) {
      const value = getter ? getter.call(obj) : val
      /* eslint-disable no-self-compare */
      if (newVal === value || (newVal !== newVal && value !== value)) {
        return
      }
      /* eslint-enable no-self-compare */
      if (process.env.NODE_ENV !== 'production' && customSetter) {
        customSetter()
      }
      if (setter) {
        setter.call(obj, newVal)
      } else {
        val = newVal
      }
      childOb = !shallow && observe(newVal)
      dep.notify()
    }
  })
}
设置值时再通知一下View视图做更新,Vue源码正是通过这种方式实现了访问属性时收集依赖,设置属性时源码有一句dep.notify,里面便是通知视图更新的相关操作。
let x = {}
Object.defineProperty(x, 1, {
      get: function(){
           console.log("getter called!")
      },
      set: function(newVal){
            console.log("setter called! newVal is:" + newVal)
      }
})
Vnode概念
Vnode,顾名思义,Virtual node,虚拟节点,首先声明,这不是Vue自己首创的概念,其实Github上早就有一个类似的项目:Snabbdom。
为啥要用Vnode呢?其实原因主要是原生的dom节点对象太大了,如果采用之前的Jquery这种方式直接操作dom,性能差,所以snabbdom或者Vue中应用了Vnode。
看看Vue源码对Vnode的定义:
export default class VNode {
  tag: string | void;
  data: VNodeData | void;
  children: ?Array<VNode>;
  text: string | void;
  elm: Node | void;
  ns: string | void;
  context: Component | void; // rendered in this component's scope
  key: string | number | void;
  componentOptions: VNodeComponentOptions | void;
  componentInstance: Component | void; // component instance
  parent: VNode | void; // component placeholder node

  // strictly internal
  raw: boolean; // contains raw HTML? (server only)
  isStatic: boolean; // hoisted static node
  isRootInsert: boolean; // necessary for enter transition check
  isComment: boolean; // empty comment placeholder?
  isCloned: boolean; // is a cloned node?
  isOnce: boolean; // is a v-once node?
  asyncFactory: Function | void; // async component factory function
  asyncMeta: Object | void;
  isAsyncPlaceholder: boolean;
  ssrContext: Object | void;
  fnContext: Component | void; // real context vm for functional nodes
  fnOptions: ?ComponentOptions; // for SSR caching
  fnScopeId: ?string;
....
}
其实大多数场景下即便有很多修改,但是如果从宏观角度观看,其实修改的点不多。
举个例子:三个dom节点A B C —-> 依次会改成 B C D
- Jquery:当碰到第一次A改为B时,修改了一次,再碰到B改为C,又修改了一次,再次碰到C改为D,又又修改了一次。(无法以全局视角看问题)
显然其实从宏观上看,只需要删除A,然后末尾加上D即可;这种优化是需要从宏观角度看才行。
- Vue:从全局看问题的方式就是异步,先把修改放到队列中,然后整成一批去修改,做diff,这个时候从统计学意义上来讲确实可以优化性能。这也是为啥Vue源码中出现下述代码的原因:
queueWatcher(this);
函数柯里化
将一个函数拆分成多个函数,是固定部分参数,返回一个接受剩余参数的函数,也称为部分计算函数,目的是为了缩小适用范围,创建一个针对性更强的函数。
// 实现一个简单的加法
function add(a,b){return a+b}
add(1,2);
// 用柯里化实现
const currying = (x) => {
     return (y) => {return x+y}
}
console.log(currying(1)(2)) // 3
柯里化函数就是高阶函数的一种。这里就会有人提问了,为什么要那么费劲实现add函数?有道经典的面试题实现add(1)(2)(3)(4)=10;
// 我们可以这样理解调用add(1)时返回一个函数fn,然后执行fn(2)依次被调用,当执行到最后一次返回结果
function add(num) {
    var sum=num;
    var fn=function(v) {
        sum+=v;
        return fn
    };
    fn.toString=function() {
        return sum
    };
    return fn
}
console.log(add(1)(2)(3)(4)) // 10
// 执行add(1)时返回了fn函数给2,3,4执行,同时定义了fn的toString方法,
// 每个对象的toString和valueOf方法都可以被改写,每个对象执行完毕,如果被用以操作JavaScript解析器就会自动调用对象的toString或者valueOf方法
// 利用toString隐式调用的特性,当最后执行时隐式调用,并计算最终的值返回
面试题的内容还有 add(1)(1,2,3)(2)=9 这样的形式
function add() {
  var args = [...arguments];
  var fn=function() {
  args.push(...arguments);
  return add.apply(null, args)
  };
  fn.toString=function() {
    return args.reduce(function (a, b) {
      return a + b;
    });
  };
  return fn
}
console.log(add(1)(1,2,3)(2))
缺点:性能上会受到影响,比如add函数里面需要创建数组去存放每次调用的时候的参数,创建闭包函数这些都会对内存跟速度上会带来花销,存取arguments对象通常要比存取命名参数要慢一点。
Vue源码是这么应用这个特性的,Vue源码中有一个platform目录,专门存放和平台相关的源码(Vue可以在多平台上运行 比如Weex)。
编译原理基础知识
首先通过parse函数将template编译为抽象语法树ast,然后对ast进行代码优化,最后生成render函数。
  const ast = parse(template.trim(), options)
  if (options.optimize !== false) {
    optimize(ast, options)
  }
  const code = generate(ast, options)
  return {
    ast,
    render: code.render,
    staticRenderFns: code.staticRenderFns
  }